
Arranging the Timeline
The timeline is where you build your mix — laying clips out across tracks and arranging them in time. This page covers moving material around and getting it to line up musically.
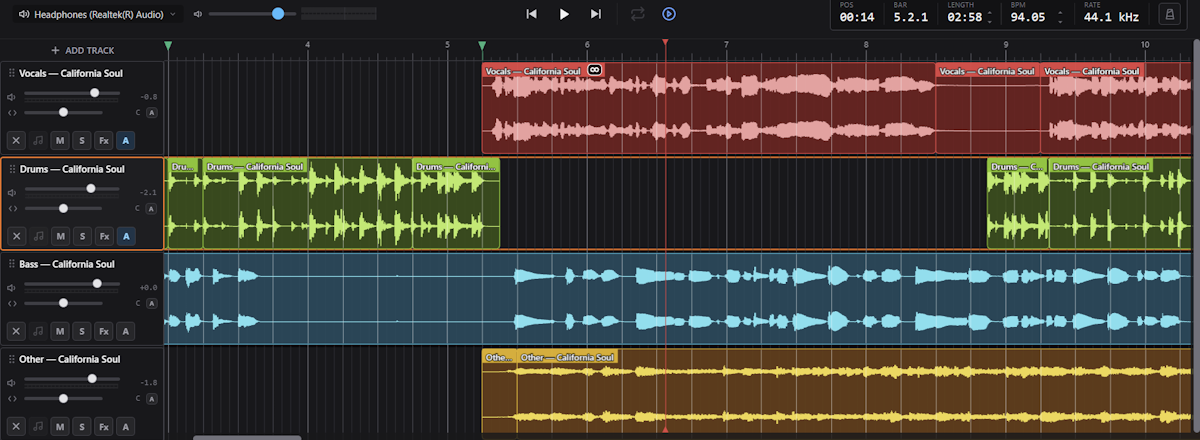
The ruler also keeps minutes-and-seconds labels visible at every zoom level, so you can work with both musical bars and elapsed time.
Tracks and clips
Audio lives on horizontal tracks, and each piece of audio is a clip. You can have as many tracks as you need — add one with File ▸ Add Track… (Ctrl+T). A new track is selected automatically, so pasting a clip, the mute / solo shortcuts, and the FX rack all act on it straight away. Drag a track header to reorder tracks, and drag its edge to resize it — it stops shrinking where its own buttons would start to squash.
You can also import directly as you arrange: drag a single audio file from Windows Explorer, or a row from the Files tab, onto a track to import and place it there. Drop it on empty timeline space to create a new track. Dropping several files creates one new track per file at the same timeline position. As you drag, a marker shows where the audio will land, just as it does when you drag from the Library.
Moving and editing clips
Select a clip by clicking it, then rearrange freely. The common actions are on the Edit menu and the clip right-click menu:
- Move — drag a clip along a track, or to another track.
- Split at Playhead (S) — in a clip's right-click menu, choose Edit ▸ Split at Playhead to cut it into two at the playhead. The menu-bar command is Edit ▸ Split Clip at Playhead.
- Edit ▸ Duplicate (D) — make a copy.
- Edit ▸ Cut, Copy, Paste (Ctrl+X / C / V) — move clips around or between tracks. Ctrl+V pastes onto the selected track at the playhead. You can also right-click an empty track lane and choose Paste to drop a copied clip onto that track — click first to place the playhead where it should land.
- Delete (Delete) — remove a clip.
- Trim — drag a clip's edge to shorten or extend how much of it plays. A linked clip can't be edge-trimmed on the timeline — unlink it first, or edit its shared trim in the Clip Editor.
- Colour — right-click a clip and choose Colour to tag it, which makes a busy arrangement easier to read.
- Rename — double-click a clip's title strip (the thin band along its top) to rename it in place. Double-clicking the clip's body opens the Clip Editor instead.
- Open ▸ Scratch Editor — start a scratch session using the clip. Saving the session creates or updates a reusable Scratch item in the Library, without replacing the clip. See Scratch Editor.
- Edit ▸ Lock / Unlock — lock a clip (or press Ctrl+L) so it can't be moved or edited by accident. A locked clip shows a small padlock on its title strip.
- Transform ▸ Split Stereo Channels… — split a stereo clip's Left and/or Right channel onto its own new track. A small picker lets you choose which channels to split out; each one you pick lands on a fresh track as a stereo clip carrying only that side. It's non-destructive, and each new clip inherits the source's grid and tempo matching, just like a stem. (The option only appears for stereo clips.)
To clean up the end of your arrangement, Edit ▸ Trim Project to Last Clip (Ctrl+Shift+T) shortens the project to finish at your final clip.
Working with several clips at once
You can select more than one clip and edit them together:
- Shift-click a clip to select a range on the same track, from the clip you first selected to the one you Shift-click.
- Ctrl-click a clip to add or remove individual clips from the selection, even across different tracks.
With several clips selected, you can:
- Move the group — drag any selected clip and the whole selection moves together, keeping each clip's position and track relative to the others. The move is refused as a whole if any clip wouldn't fit or is locked.
- Nudge the group — Shift+← / → shifts every selected clip together (hold Alt as well for a finer nudge).
- Edit the whole selection — with more than one clip selected, right-click any of them for a dedicated menu that offers Copy, Cut, Lock, Colour, Duplicate, and Delete for all of them at once (in place of the usual single-clip menu). Delete, Ctrl+L (lock), and Duplicate also act on every selected clip.
- Copy, cut, and paste the group — Ctrl+C / X / V carry the whole selection. Paste drops it at the playhead, starting on the selected track and keeping each clip's relative timing and track, and is refused as a whole if it wouldn't fit.
Each of these group edits counts as a single undo step. A plain click on one clip goes back to selecting just that clip.
Snapping to the grid
By default, clips snap to the timeline grid as you drag, so they naturally land on the beat. When you want to place something freely — for a small, deliberate offset — hold Alt while you drag to switch off snapping for fine, free placement.
Snapping applies to almost everything you move in time: clips (and groups of clips), the playhead, the boundaries of a timeline range, clip edges when you trim them, markers when you drag them, and clips dropped in from the Library.
Choosing the grid
The grid control in the status bar — the grid icon at the bottom-left of the window — sets how coarse that grid is. It changes both the grid lines drawn on the timeline and what everything snaps to, so what you see is what you snap to:
- Bar — snap to whole bars only. Good for arranging whole sections.
- Beat — snap to each beat.
- Half beat — snap to eighth notes.
- Quarter beat — snap to sixteenth notes. This is the default, and the finest musical setting.
- Free — nothing snaps. The finest grid lines stay on screen as a visual reference, but you can place anything anywhere.
Your choice is saved with the project, and changing it never marks the project as unsaved.
TIP
Because Alt already means "place freely", holding it while the grid is set to Free does nothing extra.
The keyboard follows the same setting: ← / → step the playhead one grid line at a time, and Shift+← / → move the selected clip by one grid step. On a Free grid there are no lines to step to, so these keys move by a quarter beat instead, relative to where you are — that way a deliberately off-grid position stays off-grid.
Beat Repeat
Beat Repeat creates a tempo-aligned repeat region on one track. Move the playhead to the beat where it should start, then right-click a clip or an empty track lane and choose Effects ▸ Beat Repeat. Choose the region length (1/2 Beat, 1 Beat, 2 Beats, or 1 Bar), then choose its repeat division (1/4, 1/8, or 1/16).
The repeat starts at the snapped playhead, not at the pointer location where you opened the menu. A track cannot have overlapping Beat Repeat regions. To remove one, right-click a clip it crosses, choose Effects ▸ Beat Repeat, then choose the listed checked region.
Crossfading between clips
When two clips sit side by side on the same track, you can crossfade between them so one fades out smoothly as the next fades in — handy for blending the end of one loop into the start of another, or easing between two sections.
To create a crossfade, put the two clips next to each other on a track, then drag the facing edge of one clip so it extends over its neighbour. The region where they overlap becomes the crossfade. As you drag, Silverdaw marks the overlap with a diagonal hatch; when you release, it draws the crossfade curves across both clips. The earlier clip fades out while the later one fades in.
TIP
Crossfades are made by dragging a clip's edge over its neighbour, not by dragging its body — clip bodies can't overlap and simply butt up against each other. A linked or locked clip can't be edge-trimmed, so unlink or unlock it first (see Moving and editing clips).
Right-click a clip that's part of a crossfade to change or remove it:
- Crossfade to next / Crossfade from previous — pick the shape of the fade:
- Smooth blend — an equal-power crossfade that keeps the blend sounding even in level through the transition. Good for most musical transitions.
- Fade out / in — straight fades, with one clip dropping in level as the other rises. Useful when you want a simpler, more obvious handover.
- Remove Crossfade to Next Clip / Remove Crossfade from Previous Clip — take the crossfade off again.
A clip can fade in from the clip before it and fade out into the clip after it at the same time. Crossfades play back live and are included when you export your mix.
Bar numbering
The timeline is numbered in bars, starting at 1 by default. You can change where the count starts in Project Properties using Bar counter start — setting it to 0 or lower leaves lead-in bars before bar one, which is handy for clips that begin with a silent intro.
Tempo, beats, and the grid
Everything lines up against the project tempo and its beat grid.
- When you import audio, Silverdaw detects its tempo (BPM), key, and beat positions automatically, so clips can be matched to the project.
- The first musical clip you place on a track sets the project tempo: Silverdaw seeds the project BPM from that clip's detected tempo. This happens once — later clips don't change it, and clips marked as samples don't seed it — and you can fine-tune the tempo afterwards from the transport bar (see Changing the project tempo). This is on by default; switch off Set project tempo from first clip in Preferences ▸ Timeline to keep the project at its current tempo instead.
- If detection is uncertain, you can set a clip's BPM by hand and slide the beat grid across its waveform to line it up. This is done in the Clip Editor, and is explained in Beat markers and how they are worked out. If the tempo of a whole file was read wrongly, correct it once in the Library with Edit BPM… — see Correcting a tempo.
- The project's own tempo can be set from the transport bar or in Project Properties, and can be changed at any time — see Changing the project tempo.
By default, dropping a musical clip onto a track automatically matches it to the project tempo (Silverdaw switches on Warp for you). You can turn this off with Auto-warp clips to project tempo in Preferences ▸ Timeline if you'd rather clips keep their own tempo until you warp them yourself. The first clip and simple samples are not auto-warped.
For a file whose BPM is marked with ~, the detected value is a rough average. Auto-warp applies one uniform stretch, so the grid can drift as the recording changes tempo. Split the clip into steadier sections and refine each section's beat grid for closer alignment — see When the beat markers drift.
Once a clip's tempo has been detected, Silverdaw also nudges it so its bars line up with the project's bar grid — so slicing, splitting, and marker placement stay on the beat, even when a clip begins with a little silence before its first beat. Clips with no detected beats (such as simple samples) are left exactly where you placed them. Switch this off with Align clips to the beat grid after analysis in Preferences ▸ Timeline.
Getting the grid right is what makes loops, slicing, and snapping all fall neatly into place.
Changing the project tempo
The project tempo is not something you have to settle on up front. You can change it at any time — before you start, halfway through, or once the whole remix is arranged — from the transport bar or in Project Properties. Silverdaw retimes the arrangement around the new tempo, so you don't have to move or redraw it by hand.
Everything that names a musical place moves with the music, so a clip on bar 9 stays on bar 9:
- Clips keep their bar and beat positions. A clip that follows the project tempo is also re-stretched, so it still fills the same number of bars and stays in time with everything else.
- Clip volume shapes are resized whenever the clip they are drawn on is re-stretched, so each fade and dip stays over the same part of the sound.
- Track automation lines are stretched or squashed to match, so a filter sweep written across the chorus still runs across the chorus.
- Markers, the playhead, and any timeline range move with the bars they mark.
Slow the project down and the arrangement spreads out; speed it up and it packs in — but its musical shape, and the way it lines up, are unchanged.
Which clips are re-stretched depends on how each one is set:
- While Auto-warp clips to project tempo is on (Preferences ▸ Timeline), a clip with a detected tempo is warped to the new project tempo for you.
- A clip set to Follow project BPM in the Clip Editor always tracks the project tempo.
- A clip pinned to a fixed tempo or stretch is deliberately left alone. It keeps its own speed and length, and simply moves to keep its place in the bars, so it covers a different number of bars at the new tempo.
TIP
Try your remix at a few different tempos. Nudge the BPM up or down while it plays and listen — you can always set it back.
Setting the tempo in the transport bar
The transport bar's BPM box is the quickest way to set the tempo.
- Type a tempo. Click the box and its value is selected, so you can type straight over it. Press Enter, or click away, to apply it. Press Esc to leave the tempo as it was. Click and drag across the value instead if you want to replace only part of it.
- Nudge it. Use ↑ / ↓, the small arrows beside the value, or the mouse wheel over the box, to move the tempo by 1 BPM at a time. Hold Alt for fine 0.01 BPM steps.
Tempos are always shown to two decimal places. If you make several quick adjustments in a row, Silverdaw waits until you stop before retiming the arrangement, so a large change stays smooth.
Beat markers and how they are worked out
The faint vertical white lines drawn across a clip's waveform are its beat markers. They are Silverdaw's picture of where the beats fall in that piece of audio, and they are what Chop to Grid and the Clip Editor's slicing measure against. They also decide where a clip lands when you drag it: instead of lining up the clip's left edge, Silverdaw lines up the clip's first beat marker with the timeline grid, so the music falls in time rather than the block. So it is worth understanding where these markers come from.
It is a fixed grid, not a list of beats
When a file is imported, Silverdaw analyses it and works out two things:
- The tempo — one BPM value for the whole file.
- Where that tempo lines up with the music — the point the grid is anchored to, worked out from the beats it heard across the whole file rather than from any single one of them.
From just those two numbers Silverdaw draws the beat markers like a metronome running at a fixed speed: start at the anchor point, then place a marker every beat at exactly the same spacing, all the way to the end of the file. The markers are not individually placed on each drum hit it heard.
That is a deliberate choice, and it is what makes clips reliable to work with. A perfectly even grid means the markers stay in step when you split a clip, duplicate it, trim it, or move it — both halves of a split share the same grid, so slices line up when you put them back together.
TIP
A useful mental picture: the analysis is Silverdaw tapping along to the whole track and then setting a metronome to the average speed it tapped. It is a very good average — but it is still an average.
When the beat markers drift
Because the grid is perfectly even, it can only stay lined up if the music is perfectly even too. Detection is not always exact, and this is normal:
- Programmed music (made on a computer or drum machine) usually holds one exact tempo from start to finish, so a single fixed grid fits it beautifully.
- Live and older recordings — a band playing together, tape, vinyl rips, anything not made to a click — naturally speed up and slow down a little. A fixed grid cannot follow that.
When the music drifts, the markers and the music gradually pull apart over the length of the track. The start may look perfect, the middle slightly off, and by the end the markers can sit noticeably early or late. A tiny error of a fraction of a BPM is inaudible over one bar but adds up over four minutes.
Silverdaw flags this where it can: a file whose tempo wanders shows an amber ~ 124.37 BPM badge on its Library tile instead of a plain one. Treat that as a hint that the grid is an approximation.
TIP
Drift is expected on live and older material. It is not a fault, and there are two straightforward ways to work around it — move the grid, or work in shorter pieces.
Fixing it: move the grid
If the whole grid is simply in the wrong place — every marker equally early or late, or landing on the off-beat — you don't need to re-detect anything. Open the clip in the Clip Editor and use the Beat grid panel to move it: type the correct BPM, halve or double it with ÷2 and ×2, slide the whole grid across the waveform, nudge it in 5 ms steps, or shift it by ½ beat. See Fixing the detected tempo.
If the tempo of the whole file was read wrongly — most often at half or double the real speed — fix it once at the source instead: right-click the item in the Library and choose Edit BPM…. The markers respace themselves across every clip and stem taken from that file, and nothing you placed on the timeline moves. See Correcting a tempo.
Fixing it: work in shorter pieces
Drift is a problem of distance. Over ten seconds, a small tempo error is invisible; over ten minutes it is obvious. So the most effective fix is to give Silverdaw less to average over:
- Split the track into shorter sections — a verse, a chorus, an eight-bar loop. Use Edit ▸ Split Clip at Playhead (S) or trim the clip down.
- Save that section to the Library as a Music sample (right-click the clip, then Library ▸ Save as Sample…).
- Reanalyse it — right-click the new sample in the Library and choose Reanalyse File.
Each short section gets its own tempo and its own anchor point, fitted to that section alone. Since the music barely changes speed within a few bars, each section's grid lines up far more closely than one grid stretched across the whole track — and the sections can still differ slightly from each other, which is exactly what you want.
It is worth doing this before you start chopping: accurate beat markers make Chop to Grid, snapping, and looping all fall into place on their own.
Moving the playhead
The playhead is the vertical line that marks where playback is. Click anywhere on the ruler at the top of the timeline to place it there, or drag along the ruler to move it (a grab cursor appears over the playhead). Press Space to play or stop from the playhead.
You can also move it from the keyboard:
- ← / → step the playhead one grid line at a time, and Alt+← / → step it more finely.
- Home / End — or Ctrl+Shift+← / → — skip to the start or end of the project and scroll the view there.
Playing a timeline range
Drag across the ruler, away from the playhead, to select a time range across the whole project. The range is shaded over every track. Dragging the playhead itself still only moves the playhead.
The range snaps to the timeline grid. Hold Alt while dragging to place its boundaries freely between grid lines. Drag to either edge of the view and the timeline scrolls along with you, so a range can be longer than the part of the project you can see; when you let go, the view comes back to the playhead at the range start. A click on the ruler without dragging clears the range and moves the playhead.
With a range selected, the transport's Play control becomes Play Selection and starts at its beginning — as does Space. If the range starts off-screen, the view scrolls to it. Playback pauses exactly at the end of the range, so playing again replays the range from its start rather than carrying on past it.
Turn on Loop Selection in the transport, or press L, to repeat the range instead of stopping at its end. The loop restarts seamlessly, and Reverb and Delay tails continue naturally as it wraps. L does nothing when no range is selected.
Esc clears the range and turns off Loop Selection first. Without a range, it then clears selected clips (and any selected automation point), keeping the selected track; press it again to clear the track too. The range and its loop setting are saved with the project, but are not undoable. Clear the range when you want the usual full-project playback.
While a range is active, its start also acts as a temporary jump point: the transport's previous and next buttons, Ctrl+← / Ctrl+→, and a MIDI controller's Cue buttons all step to it, without adding a saved marker.
Markers
Markers are labelled points you can drop on the ruler to mark places in your arrangement — the start of a chorus, a drop, or wherever you want to jump back to. They appear as small triangles on the ruler and are saved with the project.
- Add or remove a marker — press M to place a marker at the playhead. It lands at the exact playhead position, even if that isn't on a beat line, so it always sits precisely where you put it. Press M again at the same place to remove it.
- Move a marker — hold Shift and drag it along the ruler; it snaps to the timeline grid. Hold Alt as well for a fine drag to any position at all. (A plain drag over a marker moves the playhead instead, so the two never get in each other's way.) A marker won't move onto a spot another marker already occupies.
- Jump between markers — press Ctrl+← and Ctrl+→ to move the playhead to the previous or next marker. The start of an active timeline range counts as a marker here too.
- Clear them all — Edit ▸ Clear All Markers removes every marker in the project in one step. It's greyed out when there are none, and a single Ctrl+Z brings them all back.
TIP
To place a marker exactly on a beat, move the playhead there first — with the grid set to Beat or Bar, clicking the ruler or pressing ← / → lands the playhead right on the line, and the marker follows it.
You can also set the transport's previous / next buttons to step through markers instead of jumping to the project ends — see Previous / next buttons in Preferences ▸ Timeline. On a MIDI controller, the hot-cue pads jump to numbered markers, and a shifted or dedicated clear pad toggles a marker at the playhead exactly as M does.
The metronome
The timing display includes a Metronome click. Switch it on to hear an audible tick that follows the project tempo, so you can check by ear whether a loop or beat sits in time. Toggle it from the timing display or by pressing K. The metronome is off by default, and its on/off state is saved with the project.
Zooming
Use the View menu to change how much of the timeline you see: Zoom In (Ctrl++), Zoom Out (Ctrl+-), Reset Zoom (Ctrl+0), or pick a Zoom Preset (20%, 50%, 100%, 200%, 400%, or 800%). Ctrl+1 through Ctrl+8 jump straight to 100%–800% zoom. Zoom to Fit (Ctrl+F) sizes the whole project to fit the timeline width and jumps the view to the start.
Automating changes over time
Effects and levels don't have to stay fixed — you can draw automation that changes them across the timeline, such as a filter sweep or a fade. Automation is edited in lanes under each track; see Automation.