
Editing Clips
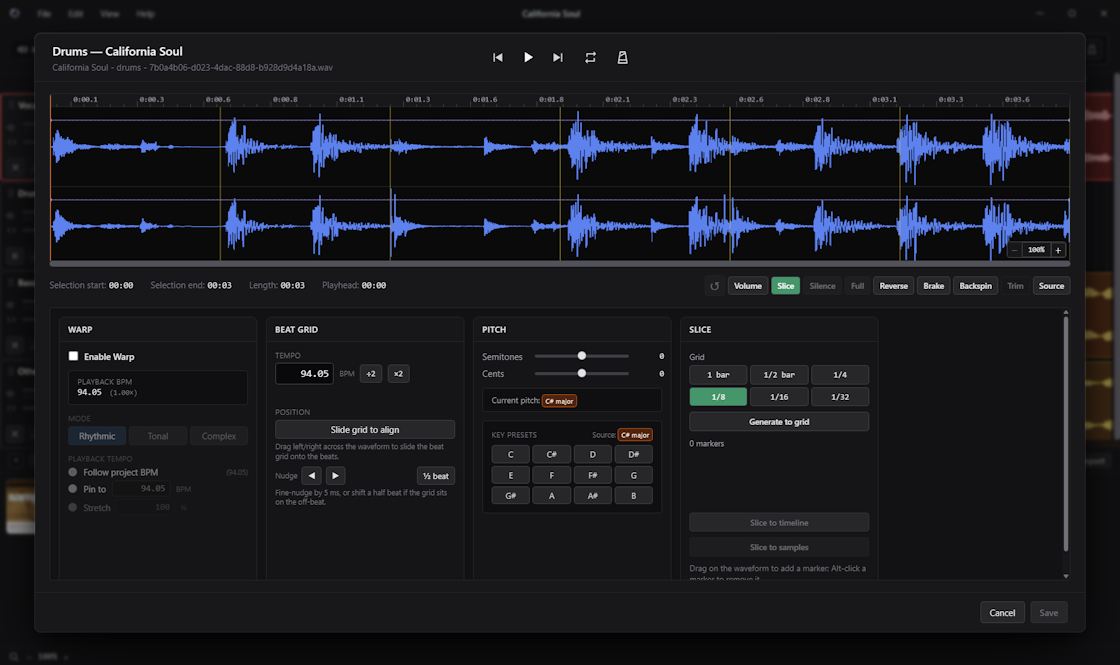
For detailed work on a single clip, Silverdaw has the Clip Editor. Double-click a clip's body, or right-click it and choose Open ▸ Clip Editor, to open it. Everything here is non-destructive — your original file is never changed, and you can preview changes as you make them.
To record a vinyl-style pattern instead, right-click a clip and choose Open ▸ Scratch Editor. See Scratch Editor.
Many of these actions are also available directly from a clip's right-click menu on the timeline.
The editor works on a draft: your changes are previewed as you make them but aren't applied until you click Save. Cancel (or Esc) discards them.
What Save affects depends on the kind of clip you opened:
- A linked clip — or a saved clip opened from the Library — Save updates the saved clip and every linked copy on the timeline together, so they stay in step. The Save button confirms this with "Save changes to the library and every linked timeline clip".
- An unlinked clip — Save changes only that one clip ("Save changes to this timeline clip only").
- An imported file opened from the Library (rather than a clip) — there's no clip to change, so the footer shows Close and Save Selection to Library (see below) instead.
If a change to the trim or tempo would make a clip overlap its neighbour on a track, Silverdaw won't save it and tells you which track clashes — for a linked clip it checks every copy. To edit one linked copy on its own, right-click it and choose Library ▸ Unlink from Library first (see linked clips).
Editing a clip vs previewing a file
The Clip Editor opens in one of two ways, and it helps to know which you're in:
- Editing a clip. Double-click a clip's body on the timeline, or right-click it and choose Open ▸ Clip Editor. You get the full editor — warp, pitch, slicing, volume shaping, and turntable effects — and your changes are kept with Save.
- Previewing a file. Double-click a Library tile (anywhere but its name) to hear the original imported file. The same window opens but shows a Preview badge, and in place of the effect panels there's a note explaining that warp, pitch, and effects are set per clip on the timeline — not on the original file. No beat markers are drawn over the waveform here, because this window is for choosing a section rather than adjusting the file's grid. To fix the tempo of the file itself, right-click it in the Library and choose Edit BPM… (see Correcting a tempo). Here you can play the file and drag out a section, then use Save Selection to Library to turn it into a clip you can edit. The footer shows Close.
In short: you shape the sound of a clip, while previewing a file just lets you listen and carve out clips to work with.
Getting around the editor
- Play with the transport buttons or the Space bar, and click the waveform to move the playhead. Home and End jump the playhead to the start and end of the current playback range.
- Zoom by holding Ctrl and turning the mouse wheel — matching the main timeline — or with + / - / 0, so you can work right down to the sample. Zoom to Fit (Ctrl+F) sizes the whole view back into the window. To pan across the waveform instead, scroll sideways or hold Shift while scrolling.
- Select a range by dragging across the waveform, then drag the handles at its edges to fine-tune it.
- Loop (L, or the round-arrows button in the transport controls) plays the current section over and over — the selected range if you've made one, or the whole clip if you haven't. Its tooltip reads Loop off when it's turned off and Loop on once it's active.
- Metronome — the metronome button in the transport (or the K key) plays an audible tick in time with the clip's own tempo while the clip plays in the editor, so you can check it sits in time. It's separate from the timeline metronome, and it isn't shown when you're previewing a raw file from the Library.
- Source / Clip switches the view between the whole source file and just the part your clip uses — handy when you want to pull a clip's edges out beyond where they currently sit. It only changes what you see; it doesn't change the clip.
- Trim narrows the view to your current selection as a preview, without changing the project.
When you open the editor on an imported file (rather than a clip), the footer offers Save Selection to Library, which turns the range you've selected into a new saved clip you can reuse — the same saved clips that appear in the Library.
Matching tempo (Warp)
A clip can match the project tempo so it plays in time with everything else, without changing the source file. Right-click a clip and choose Transform ▸ Warp, or open the Clip Editor, and tick Enable Warp to set this up. The panel shows the resulting Playback BPM so you can see the tempo the clip will play at.
How the clip follows the tempo depends on whether Silverdaw detected a tempo for the source:
- When a tempo was detected, you can Follow project BPM — the clip tracks the project tempo, so it stays in time even if you change the project's BPM later — or Pin to a set BPM to lock the clip to a specific tempo.
- When no tempo was detected (a vocal take, a one-shot, a sound effect), you get Stretch instead, which sets the playback speed as a percentage: 100% is the original speed, lower is slower, and higher is faster (from 25% to 400%). Silverdaw shows the hint "No source tempo — use Stretch to fit non-beat material like vocals."
Warp offers three modes for how the stretch is done. As a rough guide:
- Rhythmic — best for drums and percussive loops.
- Tonal — best for melodic parts and vocals.
- Complex — best for full songs and busy, layered material.
Fixing the detected tempo
If Silverdaw's detected tempo is wrong, use the Beat grid panel in the Clip Editor to correct it:
- Tempo — type the correct BPM and press Enter. If the tempo was detected at half or double the real value, use ÷2 or ×2 to fix it in one click. Once you change the tempo, the panel shows the Original value with a Restore button that puts back the tempo the clip had when you opened the editor. You can also scroll the mouse wheel over a BPM field to change it by 1 BPM at a time — hold Alt for fine 0.01 BPM steps. The same wheel adjustment works on the Warp Pin to BPM and on the project tempo, and BPM values always show two decimals (for example, 120.00).
- Position — click Slide grid to align and drag left or right across the waveform to line the grid up with the beats. Fine-tune with the Nudge buttons (5 ms earlier or later), or use ½ beat if the grid has locked onto the off-beat.
When you Save after moving the grid, the clip stays exactly where it is on the timeline: Silverdaw slides the audio inside the clip by the same amount, so every beat marker keeps the timeline position you just gave it. Adjusting the grid position on a plain timeline clip affects only that clip, so two halves of a split can be lined up independently. On a saved clip — or a linked copy of one — the grid is shared, as the rest of its settings are.
Correct Tempo: when the number itself is wrong
Typing a BPM here respaces the beat grid for the clip you're editing, and it is kept when you click Save. If the detected number was wrong for the file as a whole, the panel offers to fix it at the source instead. Type the correct tempo and an extra note appears asking, for example, "Is 98.80 BPM wrong? Setting it to 102.76 BPM keeps every clip start, marker and automation point exactly where it is." — with a Correct Tempo button.
Use Correct Tempo when Silverdaw misread the file. Use Warp (or the project tempo) when the file's tempo is right but you want the clip to play at a different speed.
A correction is made at the source in the Library, so every clip and stem taken from that file is fixed at once — and it can re-stretch clips that follow that tempo. Read Correcting a tempo for exactly what it changes and what it leaves alone. The project tempo is never touched, and your original audio file is never altered.
If the detected tempo is not simply offset but unreliable or drifting — common with live recordings, free-time intros, or tracks that change speed — it often helps to re-detect from a cleaner section. Silverdaw draws a clip's beat markers as one evenly spaced grid built from a single BPM, so a recording that speeds up or slows down will gradually pull away from it; see Beat markers and how they are worked out. Working in shorter pieces gives the analysis far less to average over:
- Split or trim the clip down to a short stretch with a clear, steady beat.
- Right-click it and choose Library ▸ Save as Sample…, then choose Music to bake that section into a new music sample in the Library.
- Right-click the new sample in the Library and choose Reanalyse File. With less — and cleaner — audio to work from, Silverdaw can often lock onto the tempo far more accurately.
You can then work from that corrected sample in place of the original. You can repeat this section by section to get a long live recording sitting tightly on the grid.
Shifting pitch
Clips can be pitch-shifted independently of their tempo — raise or lower a clip without speeding it up or slowing it down. Right-click a clip and choose Transform ▸ Pitch, or open the Clip Editor, to change it. Drag the Semitones and Cents sliders for fine tuning, or double-click a slider's number to type an exact value (press Enter to confirm or Esc to cancel). Both sliders snap back to zero as you drag past the centre, and double-clicking a slider resets it to zero. You can also use the Key presets — computed from the clip's detected key — to jump straight to a musical key. This is ideal for getting two tracks into the same key for a mashup.
Slicing a clip into loops
Slicing chops a clip into smaller pieces you can rearrange and rebuild with. There are two ways in:
- Quick: Chop to Grid. Right-click a clip and choose Transform ▸ Chop to Grid, then pick a size — 1 bar, 1/2 bar, 1/4, 1/8, or 1/16. Silverdaw cuts the clip into equal, beat-aligned slices.
- Hands-on: Slice mode. Open the Clip Editor's Slice mode for finer control, slicing on a bar or beat grid (from a whole bar down to 1/32) or by placing markers by hand.
Once you've made your slices you can:
- Slice to timeline — lay the slices back onto the timeline as separate clips to rearrange.
- Slice to samples — save each slice as its own sample in the Library to reuse and rebuild.
Slicing is non-destructive — the source file is untouched.
Shaping a clip's volume
In the Clip Editor you can draw a volume envelope right on the clip's waveform to swell, duck, fade in, or fade out. Turn on the Volume tool, then click to add points and drag them to shape the line. With a range selected, the Silence and Full buttons (S / F) instantly drop that part to silence or push it to full volume with hard edges. The shaping applies to both playback and export.
Reversing a clip
Play any clip back-to-front. Toggle Effects ▸ Reverse from the clip's right-click menu or in the Clip Editor, with a live preview. It's non-destructive, so the source file is never altered.
Turntable effects: Brake and Backspin
Shape the final part of a clip with a classic DJ move, from Effects in the right-click menu or the Clip Editor toolbar (both with live preview):
- Brake — a vinyl record-stop. It slows the final part of the clip until it stops, making the sound fall in pitch as it slows.
- Backspin — a reverse rewind. It replaces the final part of the clip with a fast pull backwards that slows to a stop, like pulling the record back.
A clip can have one of these at a time. Reverse, Brake, and Backspin are mutually exclusive — turn one on and the others stay visible but disabled until you switch it off. They apply to every linked copy of the clip, work on tempo-matched clips, and carry through to your exported mix. You can tune how long they take and how they feel in Preferences ▸ Effects.