
Preferences
Open Edit ▸ Preferences… to change how Silverdaw works. Preferences apply across the whole application (a few settings, like the audio device, can also be overridden per project in Project Properties).
Preferences are organised into tabs down the left. Changes are held until you click Save; Cancel (or Esc) discards them.
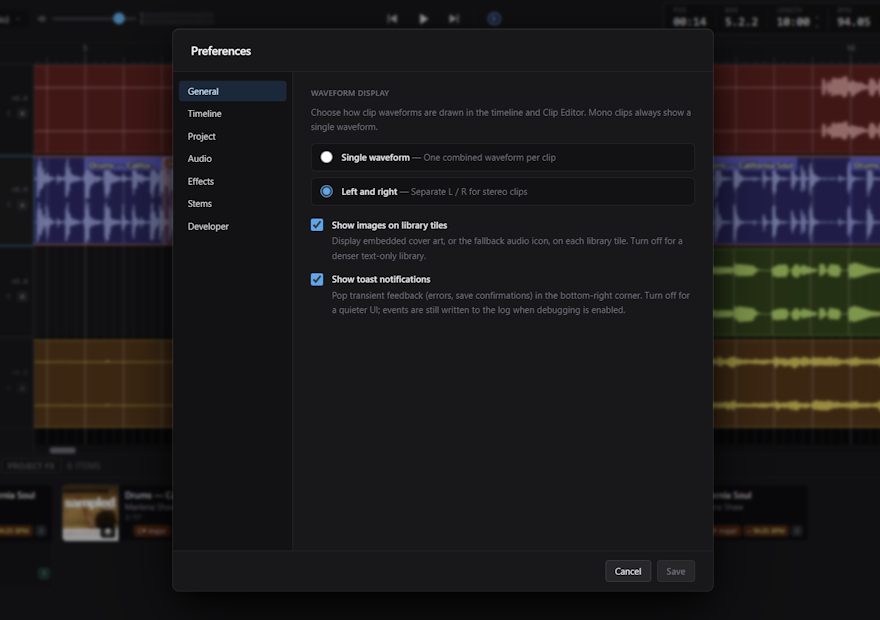
General
Appearance and notifications:
- Waveform display — choose whether clips draw a Single waveform (one combined waveform per clip) or Left and right (separate L / R lanes for stereo clips). Left and right is the default. Mono clips always show a single waveform. Your choice applies across both the timeline and the Clip Editor.
- Show images on library tiles — show embedded cover art (or a fallback audio icon) on each Library tile. Turn it off for a denser, text-only library.
- Show toast notifications — pop transient messages (errors, save confirmations) in the bottom-right corner. Turn it off for a quieter interface.
Timeline
How the timeline behaves during playback and editing:
- Follow playback — scroll the timeline while playing so the playhead stays centred. Turn it off to keep the view still. This can also be toggled from the transport bar.
- Set project tempo from first clip — when you drop the first clip onto a new project, adopt its detected tempo as the project BPM. On by default; turn it off to keep the project at its current tempo — you can always set the BPM yourself from the transport bar. (This sets the project's tempo from a clip; the setting below instead stretches each dropped clip to match the project.)
- Auto-warp clips to project tempo — when you drag a clip onto a track, automatically switch on Warp so the clip's tempo matches the project. Turn it off to drop clips at their own tempo; you can still warp any clip yourself afterwards.
- Align clips to the beat grid after analysis — once a clip's tempo has been detected, nudge it so its beats line up with the timeline's beat grid, keeping splitting and marker placement on the beat. On by default. Clips with no detected beats (such as simple samples) are left where you placed them.
- Previous / next buttons — choose where the transport's previous and next buttons jump: Timeline ends (the project start and end) or Markers (step through your timeline markers).
Project
Defaults and file handling for projects:
- Default paths — the starting Project folder for Save, Save As, and Open, and the Clip folder for adding a track from a file and for Library imports.
- Autosave — snapshot projects with unsaved changes in the background, so work can be recovered after a crash. You can set how often it saves (from 5 to 600 seconds). See Autosave and crash recovery.
- Clean up project files on remove — when you remove a stem or sample from the Library, also delete its generated file (and the empty folder it leaves behind) from disk. Off by default, so removing an item only unlinks it from the project. Your original imported files are never deleted.
DANGER
Deleting generated files with Clean up project files on remove cannot be undone.
Audio
Where and how Silverdaw plays sound:
- Default project sample rate — the rate (44.1 kHz or 48 kHz) new projects start with. Existing projects keep their own saved rate, which you can change in Project Properties.
- Output device — the device Silverdaw plays through. If you press play and hear nothing, check here first. You can also switch device at any time from the transport bar without leaving the timeline. Each device has a Keep awake checkbox — turn it on for a device that sleeps and clips the first beat (typically a USB audio device); it is off by default. If your chosen device isn't connected when Silverdaw starts — an unplugged USB or Bluetooth device, say — Silverdaw quietly switches to another available device (usually your system's default) and keeps your choice, so reconnecting the device restores it the next time you open Silverdaw. If a device disappears while you're playing, Silverdaw moves to another one on the fly so the sound keeps going.
- Audio driver — an optional, advanced choice of the audio system Silverdaw uses for the selected device. The default suits most people.
MIDI
Set up supported MIDI Controllers:
- MIDI input devices — lists connected MIDI inputs. Tick a device labelled MIDI deck controls to enable it, then click Save. Use Rescan devices after connecting a controller. Devices labelled Not supported yet cannot be enabled.
- Play audio while moving the main timeline — lets compatible platters audition audio while moving the playhead. It is off by default.
- Crossfader direction — chooses Left to right or Right to left for each enabled controller.
- Default deck — chooses None, Deck 1 (Left), or Deck 2 (Right). This applies only when the controller has no saved Headphone Cue / PFL setting. A setting made with that control takes priority and is retained for the controller.
Effects
Global defaults for the per-clip DJ turntable effects (see Brake and Backspin):
- Brake — the Duration (Short, Medium, or Long) and the Curve (linear, curved, or steep) of the record-stop slowdown at the end of a clip.
- Backspin — the Duration and the Intensity (gentle, medium, or wild) of the reverse rewind at the end of a clip.
Changing these updates every clip that already uses the effect.
Scratch
These settings shape the Scratch Editor:
- Scratch realism — choose Off, Medium, or High for increasingly textured held-platter scratching. It affects only the Scratch Editor while the platter is held. Medium is the default.
- Scratch crossfader cut — choose Z or M as the key that toggles the Scratch Editor crossfader closed and open. Z is the default.
Stems
Defaults for stem separation. Models are the engines Silverdaw uses to split a song into its parts:
- Separation models — shows whether the high-quality models are installed and offers Download models (~1 GB) to fetch them. If you already have a copy, use the Locate… buttons for the Vocal model and Drums and bass model to point Silverdaw at their folders instead of downloading again.
- Cleanup — optional per-stem tidying (Vocal cleanup, Drum cleanup, Bass cleanup, and Other cleanup), each with a Light, Medium, or Strong strength.
- Backup model — a lower-quality fallback fetched before the first separation that needs it — for example, when you select Other without selecting all four parts. You don't normally download it yourself, but a Locate… button is available if you already have it. Turn on Always use the backup model to force it even when the other models are installed.
- Hardware acceleration (experimental) — Use GPU acceleration for stem separation to separate faster on a compatible graphics card. Off by default; separation runs on the processor otherwise.
The Quality setting (Fast, Balanced, or Best) is selected when you run Separate Stems. Silverdaw remembers that choice for the next separation.