
Mixing & Effects
Once your clips are arranged, mixing is about balancing the tracks and shaping their sound. This page covers the track controls, the effects, and automation.
Track controls
Each track's header, on the left of the timeline, has the basics:
- Volume — the fader sets how loud the track is.
- Pan — just under the fader, places the track in the stereo field, from left to right. It's an equal-power control, so the level stays even as you pan. It snaps to the centre as you drag past it, and you can double-click it to centre it instantly.
- Mute — silences the track. (When it's muted, the button offers to Unmute.)
- Solo — plays only the soloed track(s) and silences the rest. (When it's soloed, the button offers to Unsolo.) When another track is already soloed, Ctrl-click a track's Solo button to switch the solo straight to that track — it solos the one you clicked and unsolos the other in a single step.
Select a track by clicking its header, then mute it with Shift+M or solo it with Shift+S.
The overall level of your finished mix is shown by the master output meter.
TIP
To set an exact level, double-click a track's gain number to type a value in decibels (dB). Use the transport's Master volume slider to adjust the overall level.
Track FX
Select a track, then open the Track FX tab in the bottom panel to shape that track's sound. (If nothing is selected, the panel prompts you to "Select a track to edit its Tone, Filter, Compressor, Punch, Saturation, Bit Crusher, and Reverb & Delay.")
Every effect slider can be double-clicked to reset it to its default value. Controls with a natural centre — such as Filter and the Tone bands — also snap to that centre as you drag past it, so you can find the neutral position without hunting for the exact spot.
- Tone — a three-band EQ with Bass, Mid, and Treble. Boost or cut each band; double-click a band to reset it to 0 dB.
- Filter — a single DJ-style sweep that runs from a low-pass filter (LPF), through off in the centre, to a high-pass filter (HPF). Perfect for build-ups and drops. Double-click to recentre it (off).
- Compressor — a single Amount control for gentle dynamics, evening out the level.
- Punch — an Amount control that boosts the attack of hits.
- Saturation — Drive adds warmth and grit; Mix blends the saturated sound with the original.
- Bit Crusher — Rate, Bits, Boost, and Mix create lo-fi digital grit.
- Reverb and Delay sends — how much of this track is sent to the shared project effects (below).
What the track effects sound like
You do not need to know audio jargon to use these controls. Make a small change, listen, then keep, reduce, or reset it:
- Tone is an EQ — it changes the balance of different parts of the sound. Bass is the low thump and weight, Mid is much of the body of voices and instruments, and Treble is the bright detail in cymbals and similar sounds. Move a band above 0 dB to boost it or below 0 dB to cut it. For example, cutting Bass can make a boomy track lighter, while boosting Treble can make it clearer.
- Filter removes part of the sound. Move it left to LPF: a low-pass filter lets the low sounds through and removes the brighter high sounds, making the track darker. Move it right to HPF: a high-pass filter lets the brighter sounds through and removes the bass, making the track lighter and thinner. The centre position is Off. Sweeping between these positions is useful for transitions, build-ups, and drops.
- Compressor reduces the difference between the loudest and quietest parts of a track, which can make its level feel steadier. Raise Amount gently if a track jumps out in places. It uses automatic makeup gain, so a higher setting can also make the track seem louder; compare it with the setting reset before deciding.
- Reverb and Delay are sends: they copy some of the track to the shared project effect, while the original track stays audible. Raise a track's Reverb or Delay send to feed that effect. You must also raise that effect's Mix in Project FX to hear it.
- Punch boosts the first part of a hit, which can make drums and other percussive sounds feel more immediate. Start with a small Amount.
- Saturation adds harmonic warmth and grit. Raise Drive to make the effect stronger, then use Mix to decide how much of that changed sound you hear.
- Bit Crusher deliberately reduces digital detail for a lo-fi sound. Lower Rate or Bits for a rougher result, use Boost to make up level, and set Mix for how much of the effect you hear.
Project FX
The Project FX tab holds the shared effects and final-output controls for the whole project. Each track decides how much of itself to send to the shared Reverb and Delay using its Reverb and Delay sends in Track FX.
- Reverb — a shared reverb for a sense of space, with four controls:
- Size — how large the space feels: small can feel close and tight, while large can feel more like a hall.
- Decay — how quickly the reverb fades away.
- Tone — brightens or darkens the reverb itself, without changing the dry track.
- Mix — how much of the reverb effect you hear. At 0% the reverb is silent.
- Delay — a shared, tempo-locked echo:
- Time — the spacing between echoes, in beats, locked to the project tempo (1/4, 1/8, 1/8T — an eighth-note triplet — or 1/16). Select a beat division directly.
- Feedback — how much each echo is fed back to make another echo. Higher settings make the repeats last longer.
- Tone — brightens or darkens the echoes themselves.
- Mix — how much delay effect you hear. At 0% the delay is silent.
- Glue Compressor — a single Amount control that gently brings the whole mix together after the shared effects.
- Safety Limiter — Protect final output caps the final output at -1 dBFS. It is on by default; clear it to turn the guard off.
The numeric controls read as a percentage — apart from Time — and you can double-click one to reset it to 0%. This shared setup is what lets several tracks sit in the same "room" together.
TIP
To hear a shared effect, raise both its Mix in Project FX and the matching track send in Track FX. Start with a small send on one track, then adjust the shared effect to taste.
Turntable and scratch effects
Silverdaw's vinyl-style effects are separate from Track FX. They change a single clip's ending or the feel of a scratch:
- Brake slows the final part of a clip down to a stop, like pressing stop on a turntable. The sound falls in pitch as it slows. Add it from Effects ▸ Brake in a clip's right-click menu or the Clip Editor; choose its Duration and Curve in Edit ▸ Preferences… ▸ Effects. See Brake and Backspin.
- Backspin replaces the final part of a clip with a fast reverse pull that slows to a stop, like a DJ pulling vinyl back. Add it from Effects ▸ Backspin in the same places and choose its Duration and Intensity in Edit ▸ Preferences… ▸ Effects.
- Scratch realism applies only while a platter is held in the Scratch Editor. It softens the held sound and adds a small amount of groove texture. Off is the clean, direct response; Medium and High add progressively more vinyl character.
Automation: changing settings over time
Most controls don't have to stay fixed — you can automate them so they change across the timeline. This is how you create a slow filter sweep, a fade, or a pan that drifts across the stereo field.
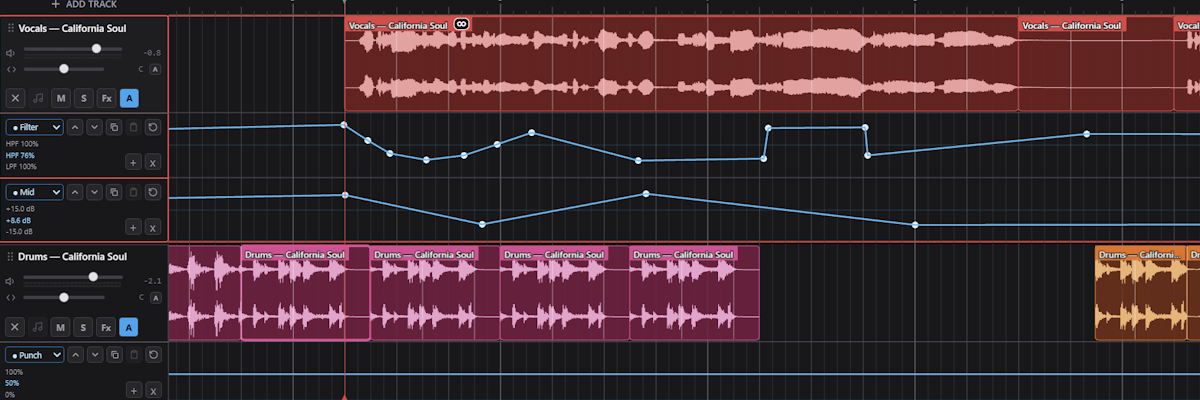
Click the A button on a track header to show its automation lane, then draw a breakpoint curve — a line with points you can shape. The first lane is Filter. The A button beside Pan opens a Pan lane instead.
Use the + button (Add automation lane) to show another parameter at the same time, then choose its parameter in the lane's parameter picker. If the track header is too narrow to show a parameter's full name, the picker shortens it and gives the full name in its tooltip. A parameter can appear in only one visible lane. The x button (Remove this automation lane) only hides its lane; it does not delete the curve. Each lane has its own height, and the visible lanes, their order, and their heights are saved with the project. You can automate:
- Filter
- Pan
- Tone — Bass, Mid, and Treble
- Reverb and Delay sends
- Compressor
- Punch
- Saturation — Drive and Mix
- Bit Crusher — Rate, Bits, Boost, and Mix
- Gain — an overall track level applied after the effects
Working with automation points:
- Add a point by clicking on the curve; drag points to shape it.
- Delete a point by right-clicking or Alt-clicking it.
- Nudge a selected point with the arrow keys.
- Raise, lower, or copy and paste a whole curve at once.
Each Track FX control also has an A button to automate it directly: the control's slider sets the resting value, and a drawn curve overlays it over time. While a curve is active, the slider follows the automation as the track plays, so you can watch each control move. Automation plays back live and renders exactly the same way in your exported mix.